
A safer pantry season starts before the first jar is filled. It begins with a clean workspace, tested equipment, fresh lids, reliable rings, the correct canner, and a clear checklist of Canning Supplies ready before produce starts piling up on the counter.
Canning can be one of the most rewarding ways to preserve food, but it is not something to approach casually. Small details matter.
A damaged jar, worn gasket, missing rack, unreliable lid, or incorrect processing method can interrupt a batch and may affect food safety.
That is why organizing your supplies before the preserving season begins is one of the smartest steps you can take.
A good checklist does more than help you shop. It can reduce rushed decisions, prevent missed steps, and create a more organized process from preparation through pantry storage.
Why a Canning Supplies Checklist Matters
Home canning is built around preparation.
Once fruit, vegetables, sauces, jams, pickles, or low-acid foods are ready, there is little time to stop and search for missing equipment.
A checklist gives you the opportunity to inspect everything before the kitchen gets busy.
That is especially important for lids, jars, canner parts, racks, and other items that affect how smoothly a batch can be processed.
Explore Canning Supplies
Get the supporting supplies ready before tomatoes, fruit, vegetables, and other seasonal foods start filling the kitchen.
Shop Canning Supplies →1. Canning Jars
Canning jars are the foundation of pantry storage. They hold the food, withstand heat processing, and protect the finished product once properly sealed.
Before the season starts, inspect every jar carefully.
Check Each Jar For
The rim deserves particular attention because the lid needs a smooth, undamaged surface to seal properly.
Use jars intended for home canning rather than ordinary commercial food jars or random glass containers.
2. New Flat Lids
Flat lids are one of the most important canning supplies because they create the seal that protects the contents during storage.
Standard flat canning lids intended for one-time sealing should generally be new for each canning batch.
The sealing compound changes during processing, so previously used single-use lids may not seal reliably again.
It is smart to keep more lids on hand than the exact number of jars you plan to fill. Extra lids help prevent a batch from being interrupted by a damaged or unusable lid.
3. Rings or Bands
Rings, also called bands, hold the flat lid in position during processing. They are not what creates the long-term vacuum seal.
Rings can often be reused when they are clean and in good condition.
Replace Rings That Are
Follow the lid manufacturer's directions when applying bands rather than forcing them excessively tight.
Explore Canning Bundles
Simplify your pre-season preparation by reviewing bundled options designed to bring useful canning supplies together.
Explore Canning Bundles →4. Water Bath Canner
A boiling-water canner is used for appropriate high-acid foods when following a current tested recipe.
Depending on the recipe, examples can include certain fruits, jams, jellies, pickles, relishes, and properly acidified tomato products.
Before the Season, Confirm
The jars should be processed exactly as directed by the tested recipe.
5. Pressure Canner
A pressure canner is required for low-acid foods when following tested pressure-canning recipes.
Low-acid foods can include vegetables, meats, poultry, seafood, soups, and certain mixed recipes.
These foods require processing temperatures above the temperature of boiling water, which is why a true pressure canner is necessary.
Useful Equipment to Check Before You Start
Review the canner and commonly replaced supporting parts before the first major preserving day.
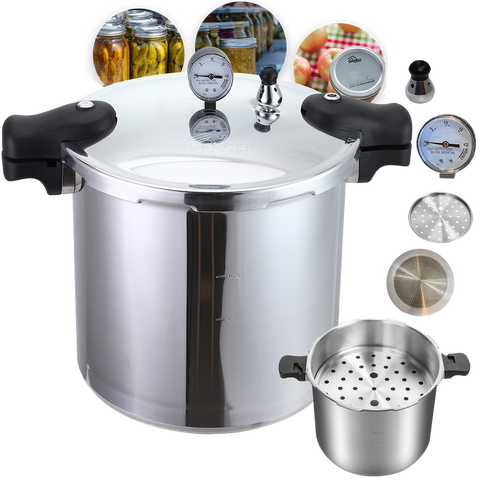
Explore Denali's pressure canning option for appropriate low-acid foods when used according to the manufacturer directions and a current tested pressure-canning recipe.
View TANKER™ →Keep spare racks available so jars can remain properly supported during compatible canning processes.
View Canning Racks →Inspect sealing components before the season and replace compatible parts when the manufacturer recommends it.
View Replacement Gasket →Inspect the Pressure Canner Before Use
Check
Food Safety Reminder: Pressure canning should always follow a current tested recipe and the canner manufacturer's directions. Use the correct jar size, processing time, pressure, venting procedure, and altitude adjustment. Do not guess processing requirements for low-acid foods.
6. Replacement Gasket
On pressure canners that use a gasket, the gasket helps the lid seal during operation.
Over time, gasket material can wear, harden, stretch, or become damaged.
Inspect it before the preserving season rather than discovering a problem in the middle of a batch.
Look for
Replacement parts should match the specific canner model and manufacturer requirements.
7. Canning Rack
A rack helps keep jars properly positioned inside the canner.
It prevents jars from resting directly on the bottom and helps provide the circulation required by the canning method and equipment design.
Check That Your Rack
8. Jar Lifter
A jar lifter is one of the simplest safety tools in a home-canning setup.
Hot jars are heavy and slippery, and ordinary kitchen tongs are not designed to grip them securely.
Use a proper jar lifter when lowering and removing hot jars according to the recipe and equipment directions.
9. Canning Funnel
A canning funnel makes filling jars cleaner and easier.
Keeping food off the rim matters because residue can interfere with the lid's ability to seal correctly.
After filling, clean the rim according to the tested recipe and lid manufacturer's directions before applying the lid.
10. Bubble Remover and Headspace Tool
Headspace is the empty space between the food and the top of the jar.
The correct amount varies by recipe and must be measured according to the tested instructions.
A bubble remover can help release trapped air where the recipe directs, and a headspace tool makes it easier to measure the required space consistently.
Review the Pressure Canning Materials Guide
Build a more complete preserving setup by reviewing the tools and supplies commonly needed for pressure canning.
Read the Materials Guide →11. Clean Towels and Workspace Supplies
Canning gets busy quickly, so prepare your workspace before filling the first jar.
Useful Workspace Supplies Include
Prepare the cooling area before jars leave the canner.
Follow the tested recipe's cooling instructions and avoid sudden temperature changes that can stress hot glass.
12. Labels and Pantry Tracking
Good labeling makes pantry management easier.
Useful Label Information Can Include
Good records make it easier to rotate jars and identify which batches were prepared together.
13. Tested Recipes
One of the most important canning supplies is not a physical tool at all.
It is a current tested recipe from a reliable source.
Safe canning depends on specific combinations of acidity, processing method, jar size, processing time, pressure when applicable, and altitude adjustment.
Do Not Improvise Safety-Critical Steps: Follow a current tested recipe exactly for the processing method, jar size, headspace, processing time, pressure when applicable, and altitude adjustment. Do not substitute a boiling-water process for pressure canning when the recipe requires pressure canning.
14. Pantry Storage Space
The process is not finished when the jars come out of the canner.
Proper cooling, seal checking, labeling, and storage are all part of the preserving process.
Once jars have cooled for the time specified by the tested recipe, check seals and prepare the jars for storage.
Prepare Pantry Space With
For standard two-piece canning lids, bands are commonly removed after jars are fully cooled and seals have been checked, unless the manufacturer or tested instructions direct otherwise.
Key Takeaways
Conclusion
A good Canning Supplies checklist can make the difference between a rushed preserving day and a more organized pantry season.
When jars are inspected, lids are ready, bands are usable, the canner has been checked, and the necessary tools are within reach, there is less chance of discovering a preventable problem in the middle of a batch.
Safety starts with the basics: use the correct jars, choose the appropriate canning method, inspect your equipment, follow current tested recipes, use the required jar size and processing instructions, and store finished jars properly.
Before the busiest part of the preserving season arrives, take time to audit your equipment and replace worn or missing supplies.
A prepared kitchen makes it easier to focus on the recipe, the processing steps, and the careful work that goes into building a well-organized pantry.
Explore Denali Canning Resources
Find more guides on pressure canning, equipment, supplies, techniques, and preserving preparation.
Explore Canning Resources →




Comments (0)
There are no comments for this article. Be the first one to leave a message!