
A pressure canner is built to take years of heavy use, but "built tough" and "cared for" are two different things. Most of the wear that shortens a canner's life has nothing to do with the number of batches run through it and everything to do with what happens in the ten minutes after it comes off the stove. A quick rinse and a shove into the cabinet works fine for a season or two, right up until a gasket cracks early, a gauge sticks, or the interior starts showing dull spots that will not buff out. The good news is that real pressure canner maintenance takes barely any extra time. Here is what actually keeps one running well past the point where a neglected one starts giving trouble.
Why Cleaning Matters More Than It Seems
It is tempting to treat cleanup as an afterthought once the jars are cooling and the kitchen is a mess. That is exactly the moment small problems get baked in instead of wiped away.
Protecting the Finish
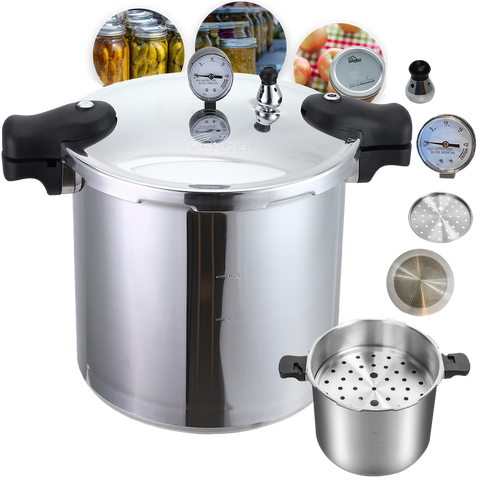
The TANKER's body combines heavy-gauge aluminum with stainless steel components, and both metals react badly to the wrong cleaning habits. Aluminum especially can discolor or pit when acidic food residue, hard water minerals, or an abrasive scrub pad sits against it for too long. None of that affects whether the canner still holds pressure, but a dull, scratched interior is a lot harder to inspect at a glance, which matters when you are trying to spot a problem before it becomes a bigger one.
Protecting the Seal
The gasket and the lid's sealing groove are even less forgiving. Leftover food residue, grease film, or a sticky splash of syrup left in the groove can keep the lid from seating evenly the next time around. A canner that will not hold pressure is almost always a cleaning and maintenance issue long before it is a defective-part issue.
Cleaning the Pot After Every Batch
Good habits here are simple, which is exactly why they are easy to skip when you are tired at the end of a long canning day.
What Warm, Soapy Water Actually Handles
Warm water and a mild dish soap handle the vast majority of what ends up on a canner after a normal batch. A soft sponge or dishcloth is enough for both the aluminum body and the stainless parts. Skip the steel wool and anything labeled abrasive, since scouring either metal wears down the reflective finish faster than any amount of normal cooking ever would.
Dealing With Mineral Deposits and Scorch Marks
Hard water can leave a cloudy film on the interior over a season of regular use, and a jar that boils over can leave a scorch ring near the bottom. Neither one needs a harsh chemical cleaner to fix.
The Vinegar Soak Trick
A simple mix of water and white vinegar, left to sit in the bottom of the pot for twenty or thirty minutes, loosens mineral film and light scorching without touching the finish the way an abrasive pad would. A soft sponge finishes the job after the soak. Rinse thoroughly afterward so no vinegar smell carries into the next batch.
Parts That Need Their Own Attention
The pot itself is the easy part. The smaller components are where most long-term problems actually start.
Useful Resources for Maintaining Your Canner
Keep the correct product pages and replacement parts easy to find before canning season gets busy.
TANKER™ Pressure Canner
Review the TANKER™ product details, included components, and care information.
View TANKER™Replacement Gasket
Keep the official replacement gasket page handy when the original seal reaches the end of its service life.
View Replacement GasketPressure Canning Equipment
Browse Denali pressure canners, racks, weights, gaskets, and related canning equipment.
Browse Pressure CanningThe Gasket
The rubber gasket is the one part built to wear out before anything else on the canner does, and how it is cleaned and stored has a real effect on how long it lasts. Wipe it down after every use, let it dry completely, and check it at the start of each season for stiffness, cracking, or a glazed look. A replacement gasket is cheap compared to a canner that will not build pressure halfway through a harvest weekend.
The Gauge and Vent
The vent pipe and the pressure regulator need a quick visual check and a clear path for steam every time they are used. Food debris or a stray bit of jar residue can partially clog the vent, and a clogged vent affects safety every bit as much as cleanliness, since it throws off how accurately the canner builds and holds pressure. A pressure weight that rocks unevenly or sits coated in residue is usually just due for a wipe-down and a look at the opening underneath it.
Why the Dial Gauge Should Never Be Submerged
A dial gauge is a sealed mechanical instrument, not a dishwasher-safe part. Submerging it or running water directly into its face can throw off the reading permanently, which defeats the entire point of having one. Wipe it with a damp cloth only, and keep it away from soaking water even when the rest of the lid goes in for a full clean.
A Once-a-Season Deep Clean
Regular wipe-downs handle day-to-day use, but a season-end pass is worth setting aside time for too, since it catches the kind of wear that a quick rinse never reveals.
Getting the Gauge Tested
A dial gauge can drift out of accuracy over time without ever looking different on the outside, which is exactly why it is worth having checked once a season rather than trusted indefinitely. Many county extension offices test dial gauges for free, and bringing it in before the season's first big batch catches a problem before it costs you a load of jars. A weighted gauge skips this step entirely, since the weight itself sets the pressure rather than relying on a needle that can slip out of calibration over time.
Looking Over the Lid and Handles
While the gauge is out for testing, it is worth checking the lid's locking mechanism and handles for any looseness, and giving the rack a once-over for rust spots. Good pressure canner maintenance catches most of this early, but hardware that fails from something other than normal wear and tear is exactly what the 3-year extended warranty is there to cover.
See Denali's TANKER™ Cleaning Guide
Review Denali's dedicated cleaning resource for additional guidance on discoloration, rust, and routine care.
Read Cleaning GuideDrying and Storing It Right
Cleaning and drying really are two separate steps, and skipping the second one undoes most of the benefit of the first.
Dry every piece completely before it goes back in the cabinet, including the underside of the lid and the inside of the rim where water likes to collect. A canner put away even slightly damp is how rust spots and musty odors start, especially on the stainless screws and the gasket groove. Store the lid off rather than locked down, both so trapped moisture has somewhere to go and so the gasket is not left compressed in one position for months at a stretch.
Keep the official resources handy: Denali's product pages, How-To library, replacement parts, and warranty information can make seasonal maintenance easier to manage.
Review Your Denali Warranty Information
Check Denali's warranty page for registration and product-support information before you need to make a claim.
View Warranty InformationNone of this adds real time to a canning day. A rinse, a dry cloth, and a thirty-second check of the gasket and vent before the lid goes back on the shelf is the whole routine. Denali Canning builds its pressure canning equipment to hold up to that kind of regular use, and a little consistency on the cleaning side is what lets a canner actually reach the lifespan it was built for instead of falling short of it.
FAQs
1. Can I put my pressure canner in the dishwasher?
No. Hand washing with warm, soapy water is the safer choice for both the aluminum body and the gauge. Dishwasher detergent and high heat can dull the finish and risk damaging the dial gauge, which should never be submerged anyway.
2. What's the best way to remove mineral stains from inside the canner?
A water and white vinegar soak for twenty to thirty minutes loosens most mineral film and light scorch marks without scrubbing. Finish with a soft sponge and rinse well so no vinegar smell lingers for the next batch.
3. How often should I replace the gasket?
There is no fixed schedule since it depends on how often the canner gets used, but a quick check each season as part of basic pressure canner maintenance catches most problems early. Stiffness, cracking, or a glazed texture are the signs it is time for a new one.
4. Can I clean the dial gauge with water?
No. The gauge is a sealed mechanical part, and submerging it or letting water run into its face can permanently affect the reading. Wipe it with a dry or barely damp cloth instead.
5. Why does the vent pipe need regular cleaning?
Food debris can partially block it, and a blocked vent changes how accurately the canner reaches and holds pressure. Checking it after every use takes only a few seconds and avoids a bigger problem mid-batch.
6. How should I store my pressure canner between canning seasons?
Make sure every part is completely dry, then store it with the lid off instead of sealed shut. This keeps moisture from collecting and keeps the gasket from sitting compressed in one spot for months.




Comments (0)
There are no comments for this article. Be the first one to leave a message!