
Home canning looks simple from the outside. Fill the jars, process them, line them up on the shelf. But the method behind those jars decides whether the shelf holds safe food or a hidden risk. For fruit, jam, and pickles, a pot of boiling water does the job just fine. For green beans, corn, chicken, venison, and homemade stock, it doesn’t, and no amount of extra time in the pot changes that. A pressure canner is the only home tool that reaches the temperature needed to make those foods safe to store at room temperature. If safe food preservation is the goal, here’s why a pressure canner isn’t an optional upgrade, and what to know before the first batch goes on the stove.
What Makes a Pressure Canner Different From a Boiling Water Bath
Both methods use heat to seal jars and stop spoilage. The difference is how hot each one can actually get, and that single number is what separates the two.
Boiling Water Stops at 212°F
Water boils at 212°F at sea level, and that’s as hot as it gets in an open pot. Turn the burner up and the water just boils harder. It doesn’t climb any higher. At higher elevations, the boiling point drops even lower. For high-acid foods, that’s enough, because the acid itself keeps dangerous bacteria from taking hold. The boiling water only has to handle molds, yeasts, and a good seal.
Pressure Pushes the Temperature Higher
A pressure canner locks the lid down and traps steam inside. As steam builds, pressure rises, and so does the boiling point of the water. At about 10 pounds of pressure at sea level, the inside of the canner reaches roughly 240°F, a temperature an open pot can never touch. That’s the whole job of the canner: creating heat that ordinary boiling can’t deliver.
Why 240°F Is the Number That Matters
240°F is the temperature needed to destroy Clostridium botulinum spores within a practical processing time. Below that, the spores survive. Every tested pressure canning time for vegetables, meat, and broth is built around holding jars at or above that temperature for a set number of minutes.
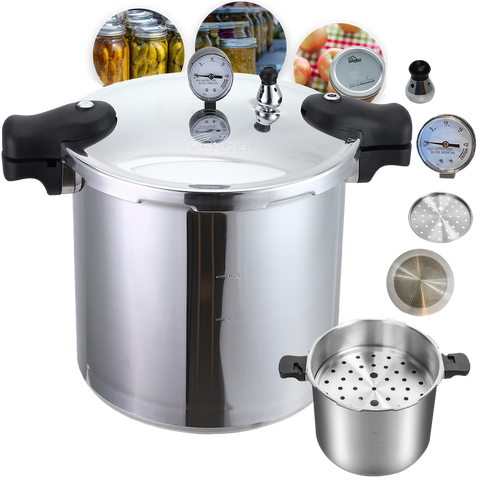
Explore the TANKER™ 23 Quart Pressure Canner
See Denali’s pressure canning system built for vegetables, meat, broth, and other foods that require higher processing temperatures.
Explore Pressure CannersThe Botulism Risk Behind Low-Acid Foods
This is the real reason pressure canning exists. It isn’t about texture, flavor, or convenience. It’s about one specific bacterium and the conditions it loves. Botulism is rare, but it’s serious enough that home canning guidance treats it as the risk every low-acid recipe is built to prevent.
The pH 4.6 Line
Foods with a pH of 4.6 or lower count as high-acid, and botulism spores can’t grow in them. Foods above that line are low-acid. Inside a sealed jar, low-acid food sitting at room temperature with no oxygen is exactly where botulism spores wake up and start producing toxin. The scary part is that contaminated food often looks, smells, and tastes normal. You can’t count on spotting it before it’s too late.
Foods That Always Need a Pressure Canner
Most vegetables fall on the low-acid side, including green beans, corn, carrots, potatoes, peas, and beets. So does every kind of meat, poultry, and seafood, along with stocks and broths. Dried beans, soups, and chili all belong here too. Many canners prefer packing meat and chunky vegetables into wide-mouth quart jars, and keeping a case of wide mouth lids on hand means a big harvest weekend doesn’t stall halfway through. For anyone canning this kind of food in real volume, a 23-quart pressure canner can hold a full load of quarts in a single run instead of splitting the batch.
Mixed Recipes Count Too
A recipe doesn’t have to be all low-acid to need pressure. Soups, stews, and vegetable blends often mix tomatoes with onions, peppers, or meat. Once a single low-acid ingredient goes in, the whole jar gets treated as low-acid and needs a pressure canner.
Build a Safer Pressure Canning Setup
Keep the core equipment and supplies ready before your next low-acid canning day.
Pressure Canner
Explore Denali’s 23-quart pressure canner and accessories for home pressure canning.
Canning Lids & Rings
Stock regular and wide-mouth lids and rings before large harvest or batch-canning days.
Pressure Canning Education
Learn pressure canning fundamentals before processing your first low-acid batch.
Why Shortcuts Don’t Replace a Pressure Canner
Plenty of old family methods promise a way around buying a pressure canner. None of them hold up when the goal is safe food preservation.
Longer Boiling Times Don’t Close the Gap
It’s tempting to think three hours in a water bath must equal one hour under pressure. It doesn’t. Time can’t make up for temperature, because the spores that matter simply survive 212°F no matter how long the jars sit in it. A water bath of any length still leaves low-acid food unsafe for room-temperature storage.
Oven Canning, Open Kettle, and Multicookers
Oven canning heats jars with dry air, which transfers heat poorly and can crack glass. Open kettle canning skips processing entirely and relies on hot food sealing the lid on its own. Neither one reaches 240°F. Electric multicookers with a pressure setting are another common question. Most aren’t approved for canning, since they haven’t been tested to hold the steady temperature a canning recipe depends on. Tested guidance also calls for a canner large enough to hold at least four quart jars, which rules out most small stovetop pressure cookers as well.
Learn the Process Before Your First Batch
Start with pressure canning education designed to make the equipment, steps, and safety practices easier to understand.
Explore Pressure Canning 101How to Use a Pressure Canner Safely
Owning the right equipment is only half the picture. The other half is running it correctly every time, using a tested recipe from a trusted source.
Vent Before You Pressurize
Jars should sit on a canning rack rather than directly on the bottom of the canner, so heat circulates evenly and glass isn’t pressed against a hot surface. Once the lid is locked, let steam pour out of the open vent for a full 10 minutes before adding the weight. Trapped air keeps the inside cooler than the gauge suggests, and venting it out is what makes the pressure reading match the real temperature.
Adjust for Altitude
Air pressure drops as elevation rises, so a canner needs more pressure to reach the same 240°F. Skipping this step is one of the most common ways jars end up under-processed. If you’re not sure of your elevation, searching your town’s name plus “elevation” gets you close enough, and many county extension offices list it on their canning pages. Write the number on the inside of a cabinet door so it’s there for every batch.
Weighted Gauge vs Dial Gauge at Altitude
A weighted gauge works in fixed steps. Most tested recipes call for 10 pounds of pressure at 1,000 feet or below and 15 pounds above that, and a 10-pound pressure weight handles the lower setting without any calibration. A dial gauge reads exact PSI, so the recipe’s altitude chart tells you which number to hold. Dial gauges should be checked for accuracy once a year.
Let It Cool on Its Own
When the processing time ends, turn off the heat and leave the canner alone. Let the pressure fall back to zero naturally, then wait about 10 more minutes before opening the lid. Forcing it to cool with cold water or lifting the weight early can cause jars to lose liquid, fail to seal, or even crack.
Keep Your Essential Canning Supplies Ready
Browse lids, rings, racks, replacement parts, and other supplies for a smoother pressure-canning setup.
Shop Canning SuppliesSafe food preservation comes down to matching the method to the food. High-acid foods can stay in the water bath. Everything else needs the heat only a pressure canner can produce. Denali Canning builds pressure canners and canning supplies for home canners ready to stock their shelves with vegetables, meat, and broth they can trust. Pick a tested recipe, vent the canner, set the right pressure, and let the process do its work.
Check Denali’s Canning FAQs
Find additional guidance on pressure canners, lids, supplies, product specifications, and common home-canning questions.
Visit the Denali FAQsFAQs
1. Why can’t I use a water bath canner for vegetables and meat?
Vegetables and meat are low-acid foods, and botulism spores survive boiling water at 212°F. Only a pressure canner reaches the 240°F needed to destroy them. Extra boiling time doesn’t make up the difference.
2. What foods need a pressure canner?
Most vegetables, all meat, poultry, and seafood, plus stocks, broths, dried beans, and soups. Any recipe that mixes high-acid and low-acid ingredients also needs pressure canning.
3. Is a pressure cooker the same as a pressure canner?
Not for canning purposes. Tested guidance calls for a canner that holds at least four quart jars and keeps a steady, verifiable pressure. Most small pressure cookers and electric multicookers aren’t approved for home canning.
4. Can I tell if home-canned food has botulism?
Not reliably. Contaminated food often looks, smells, and tastes normal. That’s why following a tested pressure canning process matters more than checking jars after the fact.
5. Do I need to adjust my pressure canner for altitude?
Yes. Higher elevations need more pressure to reach 240°F. With a weighted gauge, most recipes move from 10 pounds to 15 pounds above 1,000 feet. Dial gauge users follow the recipe’s altitude chart.
6. How long does home-canned food last when pressure canned correctly?
Sealed jars that were processed correctly keep their best quality for about a year when stored somewhere cool, dark, and dry. Always check that the lids are still sealed before opening. Throw out any jar with a bulging lid, leaks, or spurting liquid.



Comments (0)
There are no comments for this article. Be the first one to leave a message!