
Your canner sat in a closet for eight months. Now the tomatoes are coming in and you're about to trust it with a full load of jars.
Pressure canner maintenance is the short inspection that can catch worn parts, blocked vents, damaged seals, and other problems before your first batch of the season.
Most of these checks take only a few minutes with good light, warm water, and the manufacturer's manual nearby.
1. Inspect and Condition the Gasket
The sealing ring does one of the most important jobs in the pressure system, so it deserves a close look before seasonal use.
What You're Looking For
Remove the gasket and inspect it for cracking, brittleness, flattening, deformation, residue, or other signs of deterioration.
It should remain flexible and fit correctly according to the manufacturer's instructions.
The Flexibility Check
Gently flex a small section. If the gasket feels unusually stiff, damaged, stretched, or no longer returns to its normal shape, replace it rather than trying to make it work through another season.
A replacement gasket for the Denali pressure canner is one of the simpler parts to keep available before canning season begins.
Storage Habit That Helps Protect the Seal
Follow the storage guidance in your canner manual. In general, avoiding long-term compression of a removable gasket can help reduce unnecessary deformation.
Review Pressure Canner Buying Basics
Revisit the key features that matter in pressure canners, including capacity, gauges, safety systems, and stovetop compatibility.
Read the Pressure Canner Guide →2. Clear the Vent Pipe
The vent pipe allows steam to escape during venting and supports the pressure-regulating system.
How to Check It Properly
Inspect the vent opening according to the manufacturer's instructions and make sure it is clear before use.
If residue is present, clean it using an approved brush, pipe cleaner, or other method recommended for the specific model.
Why an Obstruction Matters
The vent system is part of proper pressure canner operation. Any obstruction should be corrected before processing food.
Do not operate the canner if the vent system is not clean and functioning as described in the manual.
3. Inspect the Pressure Weight
Pressure weights and regulators can be dropped, misplaced, damaged, or mixed up with similar-looking parts.
Check the Seating Surface
Inspect the part that sits on the vent pipe for visible damage, residue, or deformation.
Also confirm that you're using the correct pressure regulator or weight for your canner and the processing instructions you're following.
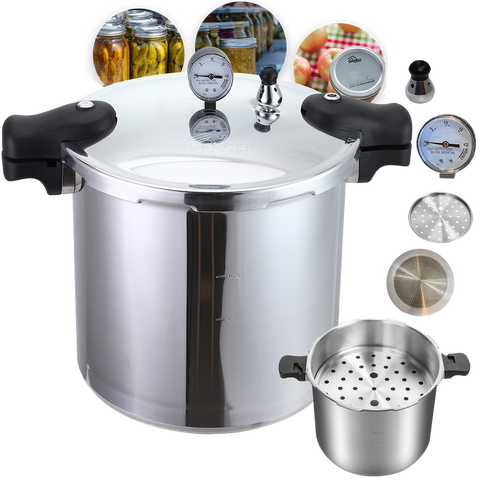
For example, Denali offers a 10-pound pressure weight and valve set for compatible equipment.
Listen During the First Batch
If your pressure regulator behaves differently than expected, follow the troubleshooting instructions in the manual rather than guessing at the cause.
Two Parts Worth Checking Before Canning Day
Keeping commonly inspected components available can prevent a failed part from delaying an entire batch day.
Useful when the existing seal becomes cracked, stiff, flattened, or otherwise damaged.
View Replacement Gasket →Review the compatible pressure weight and valve set for Denali equipment before replacing or changing regulator parts.
View 10-Lb Weight →4. Have the Dial Gauge Checked
If your pressure canner relies on a dial gauge, accuracy matters.
The Annual Accuracy Check
Follow current guidance for your gauge model and have it tested when recommended by the manufacturer or a trusted canning authority.
Extension offices in some areas offer dial-gauge testing or can direct canners to an approved testing option.
Do Not Guess Around an Untested Gauge
If your canner's safe operation depends on an accurate dial gauge, do not improvise around an unknown reading.
Follow the specific manufacturer's instructions for your equipment and use properly functioning components before processing.
Learn What Equipment Belongs in Your Setup
Review the tools and materials commonly used for safe, organized pressure canning at home.
Read the Equipment Guide →5. Inspect the Safety Components
Safety components should be clean, undamaged, and installed exactly as specified by the canner manufacturer.
Check the Overpressure System
Inspect any overpressure plug, emergency vent, lid-locking mechanism, or other safety component used by your specific model.
Do not use a canner when a safety component is damaged, stuck, missing, or installed incorrectly.
If you need to compare canners and their current specifications, browse Denali's canners and cooking appliances .
Safety Reminder: Pressure canner maintenance does not replace tested processing guidance. Always use a current tested recipe and follow the manufacturer's operating instructions for pressure, venting, processing time, altitude adjustments, cooling, and maintenance.
6. Inspect the Lid Seal Surface and Locking Hardware
The lid and pot need to align and seal correctly before the canner can operate as intended.
Inspect the Rim and Contact Surfaces
Look and feel for dents, burrs, damage, food residue, or unusual wear around the sealing surfaces.
If you find damage near an area involved in sealing or locking, contact the manufacturer before using the canner.
Don't Ignore New Stiffness
A lid that suddenly becomes difficult to install or lock should be inspected rather than forced.
Confirm that components are aligned, clean, correctly positioned, and free of damage.
7. Deep Clean and Store It Dry
Clean storage protects the canner between seasons and makes your first inspection much easier the following year.
End-of-Season Routine
Clean the pot and removable components using the methods approved by the manufacturer.
Remove residue and mineral buildup without using cleaning methods that could damage the canner's finish, vents, sealing surfaces, or safety components.
Dry everything thoroughly before storage.
Restock While You're at It
Off-season maintenance is also a good time to review jars, lids, rings, racks, and other supplies.
Denali's guide to canning lids and rings can help you review what to keep on hand before preserving season begins.
Browse Canning Supplies Before the Rush
Restock the supporting supplies you use throughout the season before produce starts arriving all at once.
Browse Canning Supplies →Make Maintenance a Seasonal Habit
Set a reminder for the beginning of your preserving season and work through the same inspection every year.
A quick inspection is much easier than discovering a damaged gasket, clogged vent, missing regulator, or worn component after your jars are already filled.
7-Point Preseason Check
If a component fails inspection, replacing the approved part is usually a better choice than trying to work around it.
Maintenance is ultimately about making sure the equipment performs the way its manufacturer intended before you trust it with a full batch.
Explore Denali Canning Resources
Read more guides about pressure canning, equipment, supplies, storage, and practical home food preservation.
Explore Canning Resources →





Comments (0)
There are no comments for this article. Be the first one to leave a message!