
The short answer: Water bath canning is for high-acid foods like jams and pickles. Pressure canning is for low-acid foods like vegetables, meat, and soups. It is not about which is better. It is about what you are preserving.
Not every food is canned the same way. Choosing between pressure canning and water bath canning comes down to one key factor: the acidity level of what you are preserving. Whether you are just getting started or expanding what you put up each season, understanding these two methods is the foundation of safe home food preservation.
Before your first batch, you will need the right equipment. A reliable canning pressure canner is essential for low-acid foods, while a large stockpot with a rack handles high-acid preserves. This guide walks you through both methods so you can choose correctly every time.
What is water bath canning?
Water bath canning is the simpler of the two methods, and a natural starting point for new canners. It works by submerging sealed jars in boiling water at 212 degrees Fahrenheit for a set amount of time. The heat destroys mold, yeast, and spoilage enzymes while creating a vacuum seal as the jars cool.
This method is safe only for high-acid foods. High acidity naturally prevents the growth of harmful bacteria, which means boiling water is enough to make those foods shelf-stable without reaching higher temperatures.
Foods safe for water bath canning
- Jams, jellies, and fruit spreads
- Pickles and pickled vegetables
- Whole fruits, fruit slices, and fruit juices
- Tomatoes with added lemon juice or citric acid
- Chutneys, relishes, and vinegar-based condiments
The keyword with water bath canning is acid. If your recipe does not have a naturally high acid content, or if vinegar or lemon juice is not part of the tested formula, water bath canning is not the right method. Using the wrong method for low-acid foods creates a real risk of botulism, which has no visible signs in a sealed jar.
What is pressure canning?
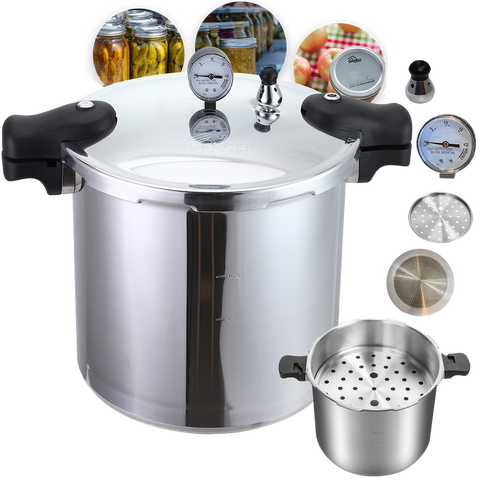
Pressure canning uses steam pressure inside a sealed vessel to bring jar temperatures up to 240 to 250 degrees Fahrenheit. That temperature range is the only reliable way to destroy Clostridium botulinum spores, the bacteria responsible for botulism in low-acid preserved foods. Boiling water simply cannot reach those temperatures at normal altitude.
Important: A pressure canner is not the same as an electric pressure cooker or Instant Pot. Those appliances are not tested or approved for home canning. A dedicated stovetop pressure canner is the only correct tool for low-acid foods.
Foods that require pressure canning
- Green beans, corn, carrots, potatoes, and other vegetables
- All meats, poultry, and fish
- Soups, stews, and chili
- Broths and stocks
- Beans, lentils, and legumes
- Mixed meals with low-acid ingredients
If a food does not appear on a tested water bath recipe, default to pressure canning. The USDA and National Center for Home Food Preservation set these guidelines based on decades of food safety research, and following tested recipes is non-negotiable for food that will sit on a shelf for months.
Key differences at a glance
| Feature | Water Bath Canning | Pressure Canning |
|---|---|---|
| Processing Temp | 212°F (boiling water) | 240 to 250°F (pressurized steam) |
| Food Type | High-acid foods only | Low-acid foods required |
| Primary Safety Risk | Mold and spoilage | Botulism if the method is skipped |
| Equipment Needed | Large pot with rack | Stovetop pressure canner |
| Beginner Friendly | Yes, easiest starting point | Moderate, manageable with practice |
| Shelf Life | 12 to 18 months | 12 to 18 months |
Which method should you use?
The answer is always determined by what you are canning, not by personal preference. If your recipe is a jam, jelly, pickle, or any other high-acid food from a tested source, water bath canning is appropriate. If you are canning vegetables, meat, soup, or anything low-acid, pressure canning is the only safe method.
Many home canners start with water bath canning to build confidence, then move into pressure canning once they have a few seasons under their belt. That progression makes practical sense. Both methods use the same jars, lids, and basic technique, so the skills transfer directly.
Equipment you need for each method
Both methods share a core set of essentials. Quality mason jars, new lids, canning rings, a jar lifter, a bubble remover, and a wide-mouth funnel are standard across both setups. Having the right canning tools before you start saves time and prevents mid-batch problems that can compromise a seal.
One detail that affects both methods equally: lid quality. A failed seal is almost always traced back to a compromised lid, a nicked jar rim, or improper headspace. Using high-quality lids and inspecting your jars before every batch is not optional, it is the difference between food that stores safely for 18 months and food you have to throw out.
A note on tomatoes: the one exception worth knowing
Tomatoes sit in an unusual middle ground. Their natural acidity varies by variety and ripeness, which means they fall just below the safe threshold for water bath canning on their own. The fix is straightforward: adding bottled lemon juice or citric acid to each jar before processing brings the pH down to a safe level for water bath canning.
If you skip that acidification step, pressure canning tomatoes is a safe alternative. Either approach works when followed precisely. The important thing is not to improvise, since both methods have tested processing times for tomatoes and those times exist for a reason.
Get everything you need in one place
Whether you are starting with water bath canning or stepping into pressure canning, having the right supplies for canning makes all the difference. Jars, lids, rings, tools, and canners built to perform batch after batch.


Comments (0)
There are no comments for this article. Be the first one to leave a message!