
Pressure canning is one of the safest and most reliable ways to preserve low-acid foods, homemade meals, and seasonal produce for long-term storage. If you're new to it, learning how to use a pressure canner might feel intimidating, but with a dependable appliance like THE TANKER™ 23-Quart Pressure Canner & Cooker by Denali, the process becomes simple, efficient, and beginner-friendly.
This guide explains how to use a pressure canner, offers essential pressure canner instructions, and shows you how Denali’s high-quality equipment supports safe and successful canning every time.
Why Choose a Pressure Canner?
Pressure canners reach higher temperatures than boiling-water canners, making them the only safe method for preserving low-acid foods. When you understand how to use a pressure cooker for canning, you unlock the ability to store vegetables, meats, soups, beans, and more—all without relying on the freezer.
Denali’s pressure canning collection includes:
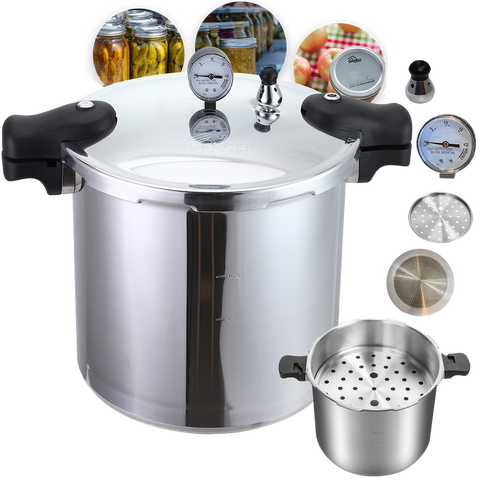
- THE TANKER™ 23-Quart Pressure Canner & Cooker
-
Replacement gaskets
-
Weighted valves (5-lb and 10-lb)
-
Canning racks (single and dual pack)
These are designed to support consistent heat distribution and dependable sealing—critical factors when canning with a pressure canner. Read more about THE TANKER™ 23-Quart Pressure Canner & Cooker.
Understanding Your Denali Pressure Canner
Before diving into how to use pressure canner equipment, it helps to know the essential components found in Denali canners.
1. Weighted Pressure Valves
Denali offers both 5-pound and 10-pound weighted valves to regulate pressure inside the canner. Using the correct weight ensures proper temperatures for safe food preservation.
2. Replacement Gasket
A high-quality sealing gasket ensures the lid locks securely and maintains internal pressure. Denali provides a durable replacement gasket designed specifically for THE TANKER™ pressure canner.
3. Canning Racks
Denali’s canning racks prevent direct jar-to-base contact and allow proper circulation inside the canner. Options include:
-
Standard rack
-
Extra-large rack
-
Two-pack set for double stacking pint jars
These racks support stable jar placement and help ensure even processing.
How to Use a Pressure Canner: Step-by-Step Guide
Below are simple, beginner-friendly pressure canner instructions designed around Denali canners and accessories.
Step 1: Prepare Your Jars
Before canning using a pressure cooker, make sure your jars are clean and warm. You can heat them by placing them in hot water or using a dishwasher cycle. Warm jars reduce the risk of breakage when filled with hot food.
Step 2: Add Water to the Canner
Add 2–3 inches of water to the canner. Unlike water-bath canning, pressure canning does not require jars to be fully submerged. The steam buildup—not the water—creates the pressure needed for safe preservation.
Step 3: Place the Canning Rack
Set your Denali canning rack at the bottom with the rim facing downward. This keeps jars elevated and prevents overheating on the base.
Step 4: Load Your Filled Jars
Use a jar lifter to place filled, sealed jars onto the rack. Keep them upright and spaced to allow proper steam circulation.
Step 5: Secure the Lid
Attach the lid to the canner, ensuring the gasket is clean and properly seated. Lock the cover securely so pressure can build correctly.
Step 6: Heat the Canner
Turn on the burner to high heat. Do not place the weighted valve on the vent pipe yet. Allow steam to escape freely until you see a strong, steady stream.
Step 7: Vent the Steam
Let the canner vent for 10 minutes. This step removes trapped air and ensures the internal temperature reaches safe processing levels.
Step 8: Attach the Weighted Valve
Fit the correct Denali valve—5-lb or 10-lb—based on your recipe and altitude needs. This weight determines the pressure level inside the canner.
Step 9: Bring the Canner to Pressure
As the canner heats, pressure will rise. You'll hear the weighted valve begin to jiggle or rock at the right pressure level. This indicates the processing period can officially begin.
Step 10: Maintain Steady Pressure
Adjust the stove heat to keep a consistent rhythm in the weight. Too many jiggles indicate high pressure; too few indicate low. Aim for a steady, controlled movement.
Step 11: Complete the Processing Time
Follow your recipe’s required time for safe canning. Different foods require different processing durations.
Step 12: Allow the Canner to Cool
Turn off the heat and let the canner cool naturally. Do not force-cool it or move it during this stage. When the pressure returns to zero, remove the weighted valve.
Step 13: Open the Lid Carefully
Open the lid away from your face to avoid steam burns. Remove jars and let them cool completely on a towel or rack.
Step 14: Clean and Maintain the Canner
After cooling, wash and dry the canner. Ensure the gasket stays clean, and check your valves and racks so they’re ready for next time.
Why Denali’s Pressure Canner Makes Canning Easier
Whether you're just learning how to use a pressure canner or you’re an experienced home preserver, Denali products are built to make the process safer and more dependable.
Denali’s canners and accessories provide:
-
Consistent pressure control with weighted valves
-
Durable gaskets for secure sealing
-
Strong canning racks that hold jars stable
-
Versatile 23-quart capacity suitable for large batches
Everything is designed to support smooth, efficient canning with a pressure canner, even for beginners.
Conclusion
Learning how to use a pressure canner is one of the most valuable skills for long-term food preservation, and Denali Canning makes it simple with dependable, high-quality equipment. From sturdy racks to precision-weighted valves, each component supports safe and consistent home canning. Whether you're preserving vegetables, meats, or full homemade meals, Denali’s pressure canner ensures reliable results every time. With the right tools, canning becomes easier, faster, and far more rewarding.


Comments (0)
There are no comments for this article. Be the first one to leave a message!